Are you looking for something to spruce up your tablescape during Halloween, then these microwave cozies are just the thing. I whipped up a few of them in two sizes–small and extra large. The small size is perfect for warming up a bowl of soup as the weather gets colder. The extra large size, a new item, conveniently fits a two-quart casserole. These items are machine washable and dryable.
Halloween Themed Cozies
04 Oct 2019 Leave a comment
in Crafts-Home Accessories, Home Decor, Sewing projects--Home Decor Tags: microwave bowl cozies
Keeping Busy
01 Oct 2019 Leave a comment
in Crafts-Home Accessories, Home Decor, Knitted Project, Redbam Crafts Tags: Bernat Blanket, Bernat Blanket Strips
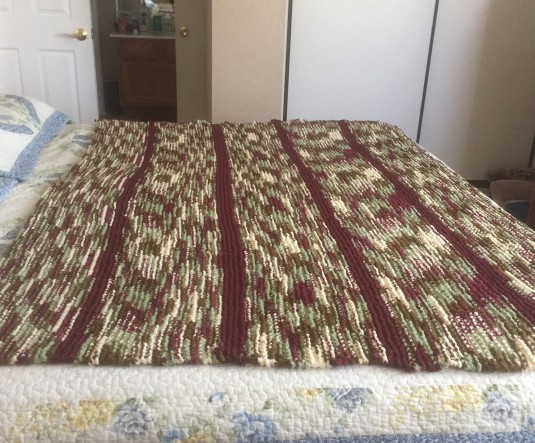
Along with sewing in my craft room I’m also busy working on my custom orders for my Bernat Afghans. This project was an enjoyable knit. The finished size is 52 by 62 inches. It will keep the recepient warm. Great for watching television or reading a book. Machine washable and dryable.
Thanksgiving Themed Microwave Cozies
01 Oct 2019 1 Comment
in Crafts-Home Accessories, Home Decor, Redbam Crafts, Sewing projects--Home Decor Tags: hostess gifts, microwave bowl cozies
As Autumn begins, we find ourselves thinking about the upcoming holidays! In particular, I’m getting ready for Thanksgiving. Here are a couple of my microwave cozies to spruce up your holiday table. These are extra large and would easily fit a two-quart casserole. They are reversible and made with a batting that is suited for microwaving. These make great hostess gifts.
Delightful Plum Fields
12 Jun 2017 1 Comment
in Home Decor, Needle Escapades

Hip! Hip! Hooray! Finished this soft and cuddly afghan last night. The finished size is 54 by 74 inches. I started this project on April 9, 2017; but, have not worked on it daily. There were periods of down time. So, I actually do not have a full measure of the time it took to complete this project.
Six skeins of Bernat Blanket yarn (10.5 oz skeins) was used. The body is done in five skeins of Plum Fields and one of Purple Plus. Using 10.5 circular needles, The initial cast on was 160 stitches. The pattern is garter stitch.
Recliner Makeover
06 Feb 2017 Leave a comment
in Home Decor, Sewing projects--Home Decor, stash Tags: home decor, recliner covers, two-hour project
Decided it was time to go through my fabric stash to find a piece that I could use to whip up a new cover for my recliner. So, I found this hunter green quilted fabric that would work well on my olive green recliner. With two King Charles Cavalier dogs who love to cuddle whenever I am on my recliner, it is important to have a cover to help keep it clean.
Using the old cover as a pattern, I cut out my new one. All edges were serged to prevent any fraying during laundering. Using double-folded matching bias tape, I finished each outer edge. Then the sections were sewn together. It only took a couple of hours to complete this project.

 I had fun putting this project together. I will make a matching one for my hubby’s recliner. Then each dog will have a recliner to nap on and I won’t have to worry about fussing with clean up.
Avoiding Winter Blahs
31 Jan 2017 Leave a comment
in Home Decor Tags: burlap bows, rustic look, wreaths
Determined not to get the winter blues I decided it was time to add splashes of color to my home decor. So off to the craft store we went to procure a new supply of wired ribbons. Back at home and going through my stash of silk flowers I started to work. Turning out a bunch of new wreaths.
Greeting visitors at the front door will see this one. Mauve wired ribbon bow and touches of burlap interwoven among pansies helped to turn out this wreath. I like the way it stands out against our front door.

Interior doors take on a different look. See here …

Wanted to try a different look for a white interior door so I turned to blending deep, bright purple flowers and pansies around a yellow dotted bow works well with this wreath. Personally, I’m not partial to purple, but, sometimes you need to stretch your preferences for dramatic effect.
Okay, that’s enough for an adventurous effort, it is time to go back into my comfort zone and a rustic touch. Those who know me would think Autumn colors and orange flowers. Ha! Guess again.
I got a great deal on several different wired burlap ribbons so I selected spring colors like–yellow, peach, and peach.
Now, I’m all set and ready to drive out any signs of winter blahs.
Bath Towel Bath Mat
18 Oct 2016 3 Comments
in Home Decor Tags: bath towel mat, braided rug, house warming gift
Stumbled across a buzz feed blog post, “Recycled Towel Bath Mat,” detailing directions to make a recycled towel bath mat. I was intrigued with this project as this would be a first for me. There was a catch, however, I did not want to use old towels. Why? Because I wanted to make a house warming gift for my daughter, who is serving in the Army. She is away from her home and family and I wanted to give her something I made with love to remind her every day of how much she is loved. So! This blog post gave me the perfect gift.
I used three bath towels to make this project–two gray and one canary yellow. Here you can see a close up of the braid and the finished product.
The process to create this bathmat was not complicated at all. Here are the instructions.
- Trim off the hems of each bath towel. Fold in half (width wise) to make it easier to handle. Then using a rotary cutter, cut strips 3 inches wide. Do this for each towel
- Taking your first strip, fold sides inward toward the center and then fold again. This should resemble a double-faced bias tape. Pin to keep in tack. Remember that you need the top edge free to be used to anchor three strips together to initiate the braiding. Repeat the folding process for the other strips. Note: I wanted to make sure each folded strip remain closed so I slip stitched the edges. You need to leave about 2 inches from the bottom edge as you need to have this open to join subsequent strips together.
- Starting at the center of the rug, twisting the braid into a coil. Stitch the coil rings together. Note: a hook needle moves this part of the process along nicely.
- Once you have completed step two for three strips, stack them on top of each other. Stitch the top edge together, turn edge over so you have a clean sewn edge and begin braiding. When you reach the end, stitch on another folded strip to each strand of the braid. Continue braiding and coiling. Continue to you have all ends have been used.
Cozy and comfy in Silver Slate
10 Oct 2016 Leave a comment
in Home Decor, Needle Escapades Tags: Bernat Blanket Yarn, garter stitch afghan
Win for last night! What’s that you say? Whose team won? What was the score? What is the prize?
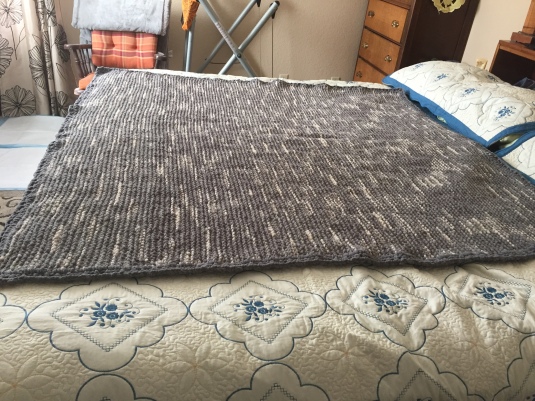
Calm down! Let me explain. The prize is a finished cozy and comfy knitted comforter in Silver Slate. Finished size 68 x 66 inches. This project took several weeks to complete. The pattern is quite simple–the entire blanket is done in a garter stitch. I used five skeins of Bernat Blanket and worked it on a pair of circular needles. Once the main part was done, I used a solid gray to crochet a two-row edging. 
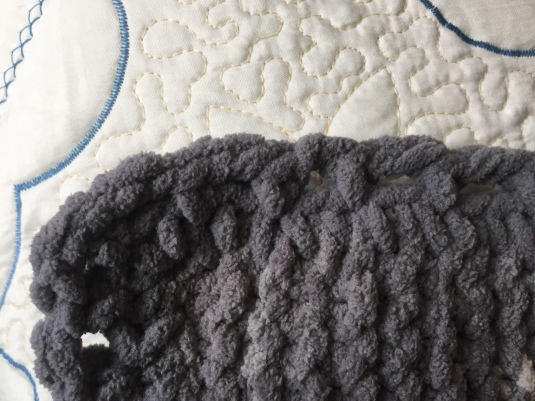
The first row of the edging is single crochet stitches and four single crochet stitches at each corner. The second row is a single crochet, chain 2, single crochet. This is repeated and between the single crochet posts, there is a space of one single crochet. See picture below to get a visual of this.

Because of the bulkiness of the yarn, you cannot see a clear distinction of the single crochet space. It was critical otherwise the effect would be quite different. The effect I wanted was simple and sleek.
Silvery Slate Gray Afghan
21 Sep 2016 Leave a comment
in Home Decor, Needle Escapades Tags: Bernat yarn, garter stitch afghan
Another yarn project is underway. This one is an afghan for an adult. I’ve selected Bernat Blanket yarn for this project. This yarn is an ultra-cozy, super bulky chenille-style yarn. I Love the fact that it comes in a wide range of stylish colors. The variegated style adds so much character to a project and in the process is complimentary to any home decor.
So as not to detract from the texture of this yarn, I opted to use a garter stitch. My foundation knit row consists of 130 stitches using 10.5 circular knitting needles. I purchased five skeins of this yarn. Each skein is 10.5 ounces. I want this afghan to be quite large so anyone can wrap themselves up in it, sit on a sofa, and watch a movie or ball game. Take a glance at the way the colors blend in this view

For a closer look giving you a better idea better idea of the texture, check out the photo below.

Stay tune for progress updates!
Pop-of-Red Granny-Squares Afghan
26 Aug 2016 1 Comment
in Home Decor, Needle Escapades Tags: braid edging, crochet, granny squares
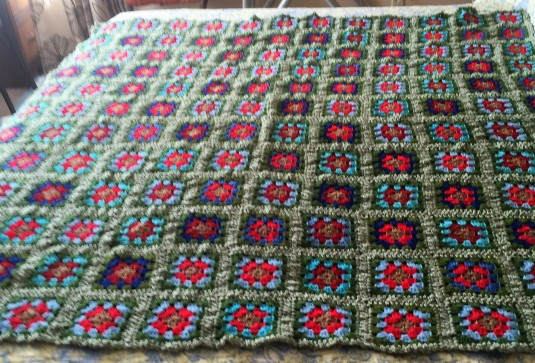
What do you do with the left-over yarn from projects of old? What type of stitch would work? Well, if you turn to an old favorite like granny squares then you have your next project. Here is my completed granny square afghan. Using a flat braid to join 144 granny squares yields a 5 ft by 5 ft afghan. 
Each granny square was made in an assembly-line fashion. What do I mean by that? You start with the center and crochet the desired number of squares. As I wanted this afghan to be large, I decided that I wanted to have 12 rows by 12 rows. All yarn used was 4-ply medium weight machine washable yarn.
Gather all of your partial skeins and begin crocheting the granny squares. In this case, I used tan yarn. To add pizzazz, red yarn was used for the second row. Row 3 of each granny square used blues. For the last row, I used a dark green. Tying all of the different squares together, I used Kelly green. The Kelly green yarn was the only yarn that wasn’t part of my stash. So, I purchased 4 skeins.


